How to Prepare for a Professional Photoshoot and Get the Most Out of It.
Do you want to make the most out of your professional product photoshoot? Getting prepared for such a shoot is essential for success, but it can be difficult to know what steps to take.
Here, we explore how to optimize your product photoshoot and ensure it produces great images.
Introduction
Having professional product photos for your business is a great way to boost sales, gain credibility, and give your brand a more polished look. Professional product photography can enhance your company’s image and appeal to customers by showcasing items in an idealized way. But, preparing for a photoshoot takes careful planning. Here are the things you should consider when getting ready for a professional product photoshoot in order to get the most out of it:
1. Set realistic goals: Before booking the shoot, determine why you need photos and what you want out of it. Consider whether you want artistic shots or images that will better inform customers about the product. Decide whether this is a one-time photoshoot or if you plan on investing in more shoots in the future.
2. Have a clear theme: If possible, choose one or two themes that resonate with your brand identity and which best fit your product’s purpose and usage scenarios. Having one unified theme gives consistency to all of your images and makes each shot more effective at telling a story about your product rather than appearing like random snapshots.
3. Pick an appropriate styling package: To get great results from each shot, consider hiring either an art director/stylist who specializes in creating beautiful visuals or purchasing pre-styled scenes from stock websites like Shutterstock or Depositphotos . These packages can save you time on creating props, surfaces and textures that best showcase each item’s features while adding value to photographs with creative uses of color and texture within the scene.
4. Research photographers : Depending on what type of products you have, look for photographers with specialized experience in photographing them — technology items will require specific lenses and lighting details compared to food photography for example . Investigate their portfolio extensively so you can decide whether their style matches with yours before reaching out to discuss availability.

What to Consider Before the Photoshoot
If you’re looking to take professional product photos, there are several things to consider before the photoshoot. Taking the time to think through these details before the session can save time and money and help you get the most out of your photoshoot.
Require Fees & Forms: Discuss possible fees and payment upfront, such as rental fees for studio or equipment rental fees. This can help to avoid confusion during the shoot. Ensure that all necessary legal forms are filled out, including model releases if applicable.
Location & Lighting: Depending on your needs, you may choose an indoor or outdoor location for your photoshoot. It is also important to consider lighting when deciding on a location; depending on light schedules it may be best to stay indoors or adjust light for an outdoor shoot with diffusers or reflectors if available.
Photography Supplies: Consider what supplies may be needed in advance of shooting day such as backdrops, props, lighting equipment, etc., and make sure it’s all available in advance of the session. If renting any of these items offsite, plan ahead so they they arrive in time.
Vendors & Team: Make sure that any vendors you need have been contacted prior to shooting with clear information about the makeup of the team (number of people on set) and duration of their services required so that their availability can be managed accordingly for project efficiency and effectiveness.
Preparing the Product and Space for the Photoshoot
Before your photoshoot, it is important to make sure your product is properly prepared. You will want to eliminate any blemishes or dirt that may be present on the item, as well as make sure that the color or texture depending on what type of product you are photographing, is presented in the best light possible. Additionally, you should take into consideration the background in which you are shooting the product. Depending on whether you prefer a solid background or one with a more textured look, like woodgrain or marble, ensure this is ready for your photographer’s arrival.
It’s also a great idea to prep your workspace for once the photographer arrives for their photoshoot. If you do not have professional lighting equipment such as scrims and softboxes already set up in your workspace for them to use, then make sure that there are several 100-watt light bulbs available that can be used at each location the photos will be taken from. As photographs will likely need to be taken from different angles and distances from the items being photographed, providing an area with ample access points and plenty of space between each area can help expedite both preparation of scenery during setup and capture of product photos during the photoshoot itself. With all areas prepped prior to their arrival, this can help save both time and energy during their allotted time frame with you!

Choosing the Right Photographer
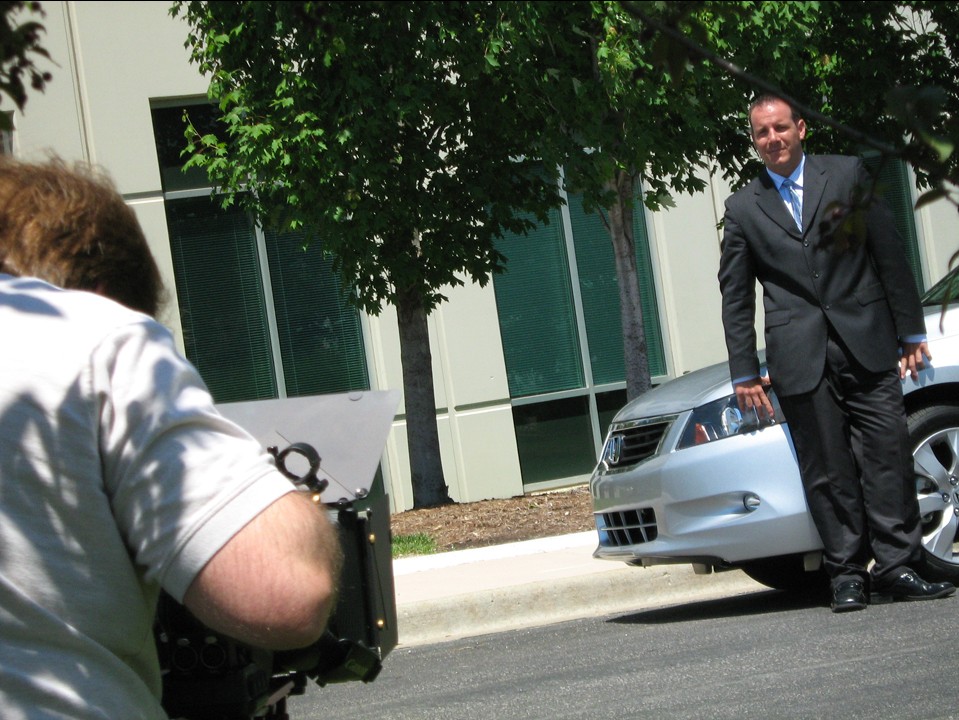
Finding the right photographer is one of the most important steps in preparing for a professional product photoshoot. It’s not only important to find a photographer who can capture great images, but also someone who understands your specific product, knows how to meet your budget and deadlines, and is adept at working with both hardware and software.
When looking for a photographer, start by researching local photographers. Be sure to ask if they have experience with product photography specifically. Professional photographers may provide services such as pre-photoshoot consultations, post-photo editing services such as color correction or cleaning up spots or smudges on the product, or even video services that may be integrated into your final product images. Do research and ask questions to make sure you are hiring someone with ample experience and expertise.
Next, be sure to understand exactly what kind of files you will be receiving from your photographer. Usually it will be digital images in .JPEG format just as you would receive from any digital camera — this is ideal for many applications — but depending on how sophisticated the photographic setup is, you may also require .RAW files which come directly from the camera after data processing (and are required for extreme edits). Your photographer should provide you with his/her preferred files so that you have the highest quality materials possible.
Finally, make sure that both parties are clear about exactly what’s expected at each stage of the photoshoot so that there won’t be any misunderstandings when it comes time to deliver results. Once everything’s settled ahead of time (time frame, cost/payment etc.), a good photoshoot should turn out some stunning visuals while delivering a stress free user experience; creating great memories while providing memories that last forever!
Setting Up the Photoshoot
Before you begin the photoshoot, it is important to ensure that everything is properly set up and that you have all the necessary equipment. You should consider the following aspects:
Location: Choose a suitable location for the photoshoot. Make sure it has enough room to work in and access to lighting. You may also want to choose a setting that complements your product or reflects its intended use.
Lighting: Proper lighting is essential for achieving high-quality product photos. Ensure that your setup provides enough natural or artificial light and adjust it as needed before you begin shooting.
Backgrounds: While some product shots may only require a plain background, more complex images will often benefit from a more detailed backdrop which can be either an airbrush painting or any other type of decorative material such as fabric, paper, etc.
Props: Depending on the look you’re trying to achieve, props can add depth and interest to your shot. If your product is intended for outdoor use, then outdoor elements such as foliage can create a great scene!
Angles & Focus Distance: Different angles will give results of different levels of detail in your shots; consider wide-angle, long-distance and macro shots depending on what kind of image you are trying to produce before starting the session.
Tips to Get the Most Out of the Photoshoot
When preparing for a professional product photoshoot, there are several steps to take in order to ensure you get the most out of it. First, figure out the specific goals that you want to achieve with the photography and discuss them with your photographer before the photoshoot begins. This will help him or her understand what kind of photos you have in mind and it will help you both come up with a plan on how to best capture those images.
Properly staging the product is another important way to get the best out of a professional photoshoot. Make sure that all of your items are organized neatly, laid out symmetrically, and placed carefully within the range of your camera’s capture angle. Additionally, make sure all props used in styling are also staged properly; use similar hues throughout staging to create cohesion and interest in your shots.
If possible, try taking several different shots of a single product; this ensures that multiple angles and perspectives can be used when creating a cohesive set of visuals for marketing purposes or documents. Additionally, try including lifestyle elements such as plants or other objects that could positively compliment your product shots – including these elements adds additional depth and life into product-based imagery.
Lastly, hiring a professional photographer may add an extra layer of difficulty due to cost considerations; however, hiring professionally makes it easier to accommodate unexpected variables or complications while shooting because they already come familiar with studio settings and equipment setup as well as finding practical solutions quickly so time is not wasted during shoots. Taking these things into consideration during planning can allow for maximum efficiency during photoshoots so their corresponding costs are worth the results produced afterwards!
Post-Photoshoot Editing and Retouching
Once you’ve completed your photoshoot and received photos from the photographer, the next steps involve post-processing and retouching work to ensure the photos meet your expectations. Post-processing involves activities such as color correction and sharpening. Retouching, which is at times referred to as image or photo manipulation, should be done to ensure that photos have a balanced and pleasing look.
Aspects such as image composition, lighting, focus or depth of field can be improved with retouching. For example, you can adjust the brightness or contrast of an image to make it stand out more in comparison to other elements of a shoot. You can also remove unwanted elements from a picture such as removing wrinkles on clothing items or blemishes on faces in portrait shots.
Retouching is still an art form in itself due to its popularity with fashion magazines and other professional photography businesses. Make sure you consult your photographer regarding any retouching needs prior to starting a project with them; this way decisions on how far post-processing needs need to go can be finalized up front.
Final Thoughts
Before you get to the product photoshoot, carve some time out of your schedule to understand the needs of the people that will be working on it in order to create a relaxed and productive atmosphere. Everyone should have clear expectations and know what they will be expected to do. If there are any questions, they should be discussed before everyone shows up on site the day of shooting. As with any project, communication is key!
Once you’ve got an understanding of what’s required for a professional product shoot, you can start gathering the materials needed to make it all happen. Think about background colors and textures that will complement your product, make sure there’s enough light for your camera settings, choose props that fit into the concept and mood you want to set for each shot, and think about how you want to arrange everything before anyone starts setting up.
When it comes time for shooting day itself, practice patience – ensuring that each individual shot is perfect will take time and dedication. Have a specific plan in mind before taking each shot- make sure lighting is up to par; try different angles; position objects in relation to one another; experiment until the desired result has been achieved.
Finally, take notes throughout- make sure these elements are recorded so that they may be referred back to later in post-production or used as references when doing additional shoots with similar products in future! With a bit of planning prior to your shoot date as well as attention during production itself–you’ll walk away with amazing results every time!
stlouiscorporatevideo@gmail.com
Rob Haller
314-604-6544
4501 Mattis Road 63128
St Louis Producer
St Louis, Missouri, USA | Video Production & Photography Services
